Connector Configuration
What questions does this guide answer?
- What Auth Types Moveworks supports for Creator Studio Connectors
- How to configure those Auth Types
- What Auth Types we don't support and how to engage with us if you need an unsupported Auth Type
Step 1: Connector Basic Info
For first time connecting to a system, set up a new connector with:
- Name
- Description
- Base URL
- Auth Config
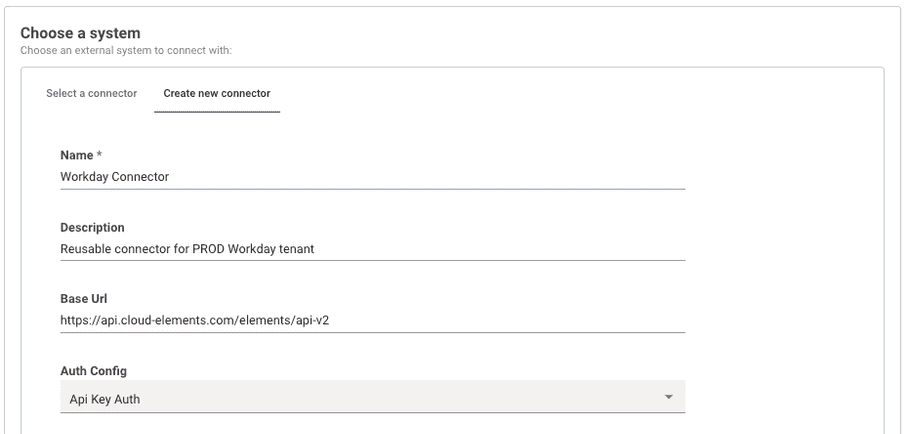
Securely store credentials based on your auth type:
Step 2: Connector Auth Type Info
No Auth
Authorization details will not be included in a request sent by Moveworks unless you specify an authentication method. If your request does not need authorization, simply chooseNo Auth from the Auth Config dropdown list.API Key Auth
API Key authentication entails sending an API key as a key-value pair when using API key authentication. This can be included either in the request headers or as query parameters.
To set this up, chooseAPI Key from the Auth Config dropdown list.API Key with API Key Auth Auth Type : Header Auth
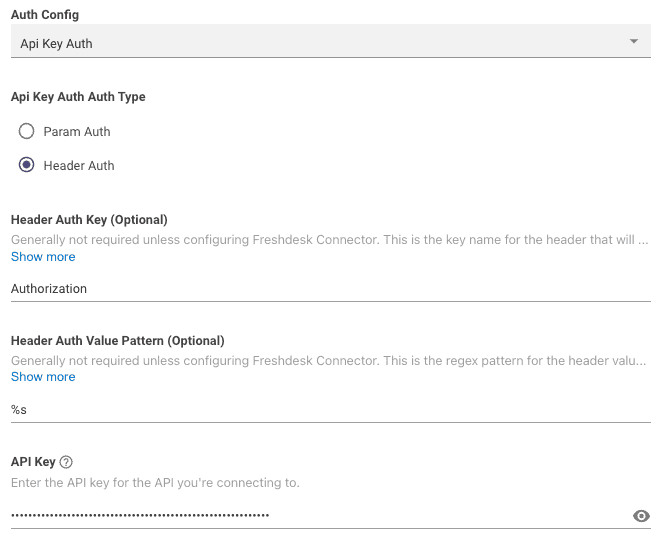 Next, input your API
 Header Auth Key, Header Auth Value Pattern, and API Key into their respective fields. Header Auth Key: This is the Header Key associated with your API key. In the example, it is set to 'Authorization'Header Auth Value Pattern: This field allows for regex mapping of the API key value by using%s.- For example,
Bearer %swould sendBearer <YOUR API KEY>as the value in the API Request
- For example,
API Key: This is where you input the actual API key value itself.
API Key with API Key Auth Auth Type : Param Auth
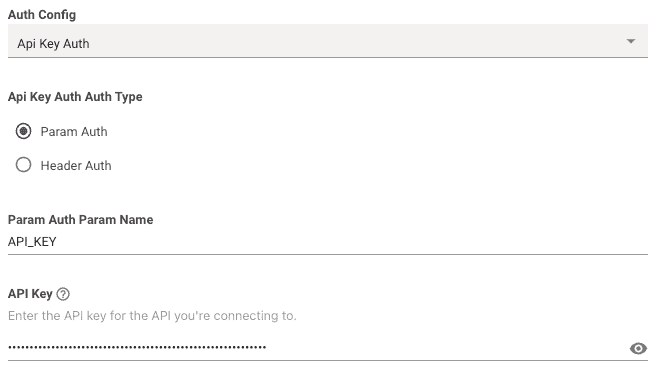 Next, input your API
 Header Auth Key, Header Auth Value Pattern, and API Key into their respective fields. Param Auth Param Name: This is the Paramter Name associated with your API key. In the example, it is set to 'API_Key'API Key: This is where you input the actual API key value itself.
Bearer Token Auth
Bearer tokens allow requests to be authenticated using an access key, like a JSON Web Token (JWT). This key is represented as a text string and should be included in the request header.
The Authorization header sends your Bearer Token prepended with the word 'Bearer' in the following format:Bearer <YOUR BEARER TOKEN>To set this up, choose API Key from the Auth Config dropdown list.
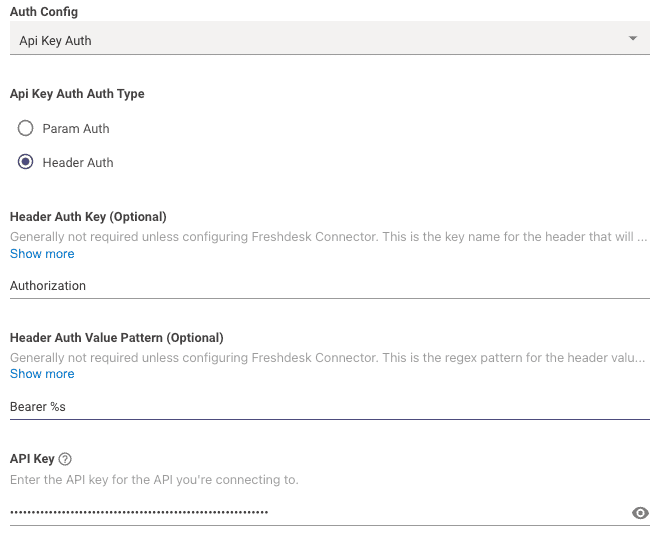
Next, copy & paste the below info into your Connector config:
Header Auth Key: This field will beAuthorizationHeader Auth Value Pattern: This field will beBearer %sAPI Key: This is where you input the actual API key value itself.
info
Header Auth Value Pattern to fit your needs.Basic Auth
Basic authentication entails sending a validated username and password along with your request.
The Authorization header sends the API a Base64 encoded string that encapsulates your username and password values, preceded by the term 'Basic' in the following format:Basic Base64Encoded("<username>:<password>")To set this up, choose Basic Auth from the Auth Config dropdown list.
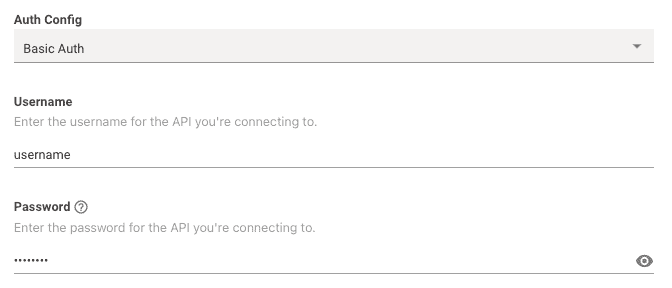 Next, input your API
 username and password into their respective fields. OAuth 2.0 with Grant Type : Client Credentials
OAuth 2.0 with Client Credentials grant type entails sending a valid Client ID and Client Secret in exchange for an Access Token. This Access Token is then used in subsequent requests, usually as a Bearer Token, to authenticate the API Request.
To set this up, chooseOauth2 from the Auth Config dropdown list.Required Info
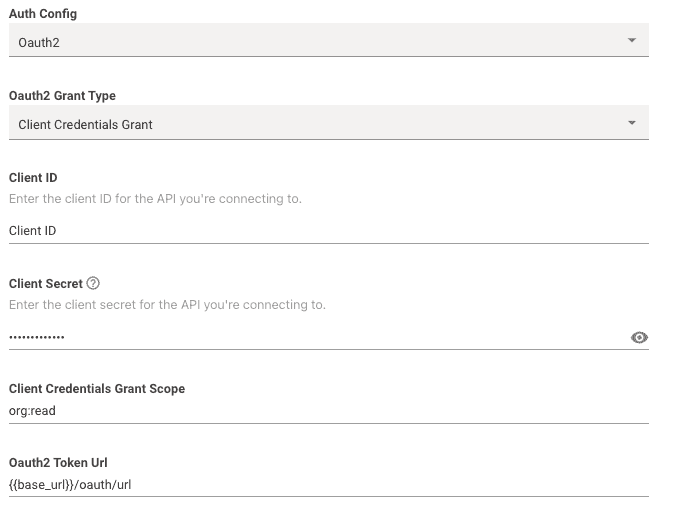
Oauth 2 Grant Type: This should be set toClient Credentials GrantClient ID: This is where you input your actual Client ID value itself.Client Secret: This is where you input your actual Client Secret value itself.Client Credentials Grant Scope: This is where you can optionally input scopes associated with the OAuth credentials.- Note: Multiple scopes are separated by a single space
Oauth2 Token Url: This is where you input the full token URL.
Additional Info
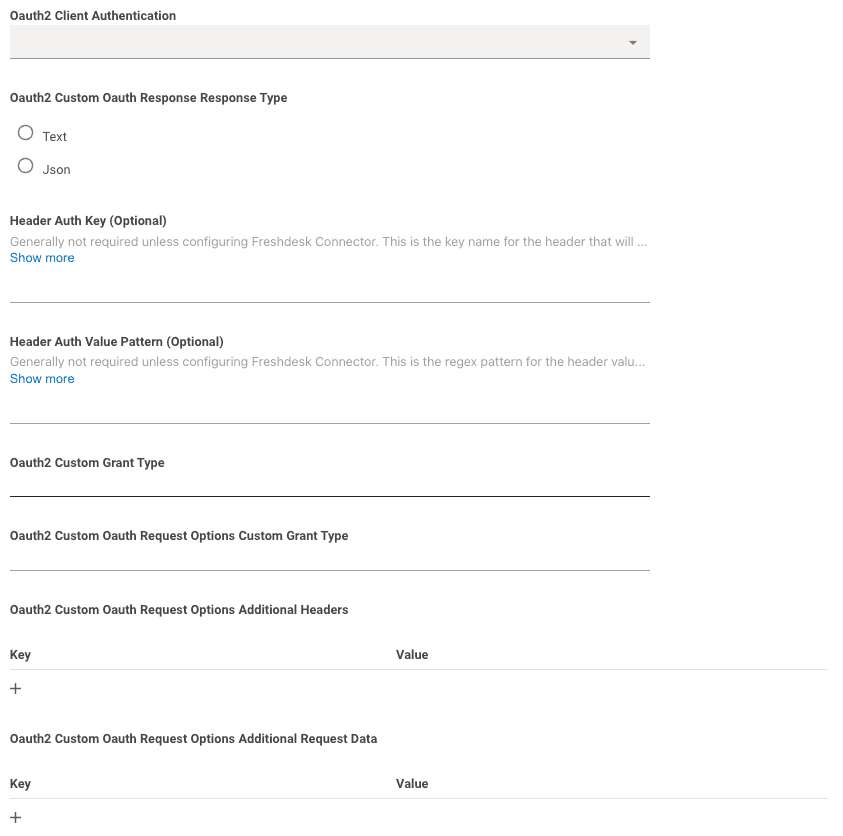
Oauth2 Client Authentication: This can be left blank. Moveworks will try making the request with both Basic Auth and Request Body Auth by default.Header Auth Key,Header Auth Value Pattern,Oauth2 Custom Grant Type,Oauth2 Custom Oauth Request Options Custom Grant Type,Oauth2 Custom Oauth Request Options Additional Headersshould all be left blank.
- If needed, you can leverage
Oauth2 Custom Oauth Request Options Additional Request Datato send additional body data needed for the request.- data is sent in x-www-form-urlencoded format in the body like so:
curl --location 'URL' \
--header 'Content-Type: application/x-www-form-urlencoded' \
--data-urlencode 'client_id=abcd-1234' \
--data-urlencode 'client_secret=Kv12CQ9JppJ1gpGYgiPqek5mUHq8EGqOR5FTywdLIE' \
--data-urlencode 'Custom-body=abcde12345' \
- data is sent in x-www-form-urlencoded format in the body like so:
OAuth 2.0 with Grant Type : Refresh Token
OAuth 2.0 with Refresh Token grant type entails sending a valid Client ID and Client Secret in exchange for an Access Token and a Refresh Token.
This Access Token is then used in subsequent requests, usually as a Bearer Token, to authenticate the API Request.
When this Access Token is expired, the Refresh Token is used to retrieve a new one from the token url.To set this up, choose Oauth2 from the Auth Config dropdown list.Required Info
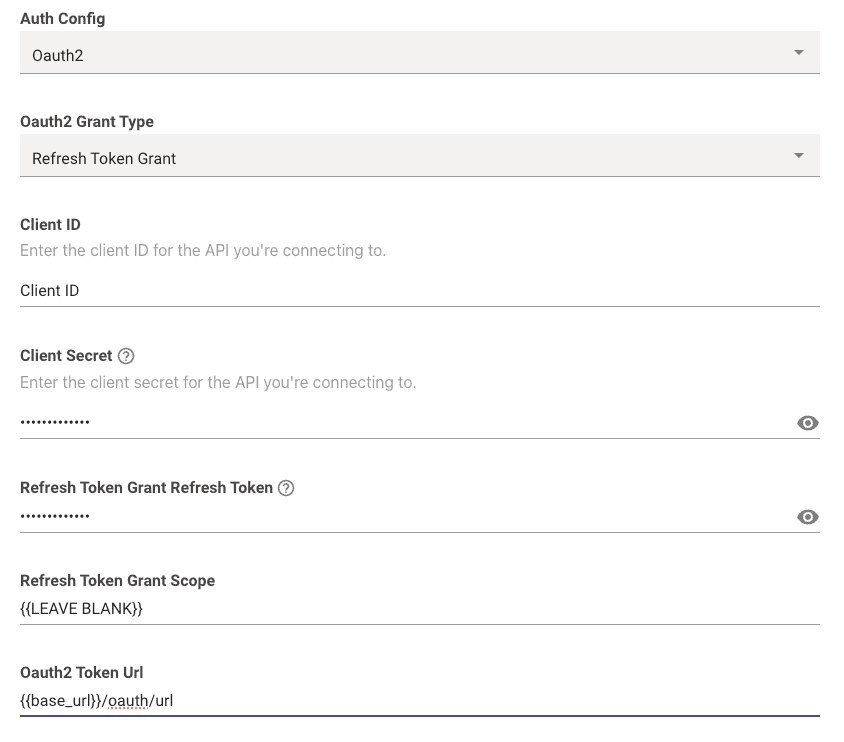
Oauth 2 Grant Type: This should be set toRefresh Token GrantClient ID: This is where you input your actual Client ID value itself.Client Secret: This is where you input your actual Client Secret value itself.Refresh Token Grant Refresh Token: This is where you input your actual Refresh Token value itself.Client Credentials Grant Scope: Leave this blank.Oauth2 Token Url: This is where you input the full token URL.
Additional Info

Oauth2 Client Authentication: This can be left blank. Moveworks will try making the request with both Basic Auth and Request Body Auth by default.Header Auth Key,Header Auth Value Pattern,Oauth2 Custom Grant Type,Oauth2 Custom Oauth Request Options Custom Grant Type,Oauth2 Custom Oauth Request Options Additional Headers, andOauth2 Custom Oauth Request Options Additional Request Datashould all be left blank.
OAuth 2.0 with Grant Type : Password Credentials
OAuth 2.0 Password Credentials is an authentication method that allows a user to exchange their username and password for an Access Token. This Access Token can be used in subsequent requests to authenticate API calls, typically as a Bearer Token. When the Access Token expires, the user's credentials can be used to obtain a new one from the authorization server.
To set this up, chooseOauth2 from the Auth Config dropdown list.Required Info
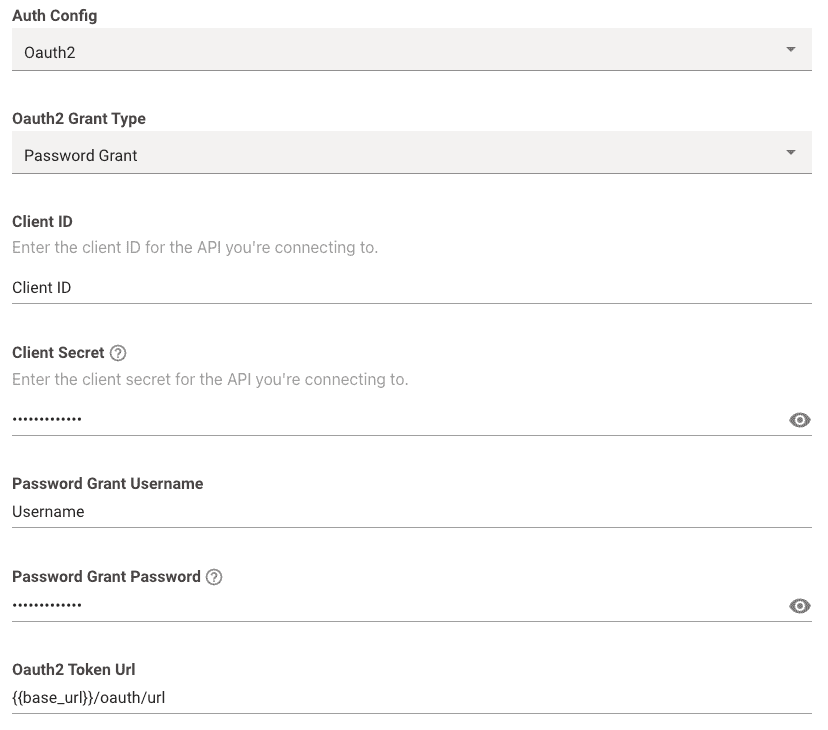
Oauth 2 Grant Type: This should be set toPassword GrantClient ID: This is where you input your actual Client ID value itself.Client Secret: This is where you input your actual Client Secret value itself.Password Grant Username: This is where you input your actual Username value itself.Password Grant Password: This is where you input your actual Password value itself.Oauth2 Token Url: This is where you input the full token URL.
Additional Info

Oauth2 Client Authentication: This can be left blank. Moveworks will try making the request with both Basic Auth and Request Body Auth by default.Header Auth Key,Header Auth Value Pattern,Oauth2 Custom Grant Type,Oauth2 Custom Oauth Request Options Custom Grant Typeshould all be left blank.
- If needed, you can leverage
Oauth2 Custom Oauth Request Options Additional Headersto send additional Headers needed for the request.- This is what your headers will look like:If you want to add any additional headers they'll get added to the headers:
Client-Id: XXX Client-Secret: YYY Username: AAA Password: BBBClient-Id: XXX Client-Secret: YYY Username: AAA Password: BBB Customer-Header: Custom-Value
- This is what your headers will look like:
- If needed, you can leverage
Oauth2 Custom Oauth Request Options Additional Request Datato send additional body data needed for the request.- data is sent in x-www-form-urlencoded format in the body like so:
curl --location 'URL' \
--header 'Content-Type: application/x-www-form-urlencoded' \
--data-urlencode 'client_id=abcd-1234' \
--data-urlencode 'client_secret=Kv12CQ9JppJ1gpGYgiPqek5mUHq8EGqOR5FTywdLIE' \
--data-urlencode 'Custom-body=abcde12345' \
- data is sent in x-www-form-urlencoded format in the body like so:
OAuth 2.0 with Grant Type : jwt-bearer
The OAuth 2.0 jwt-bearer grant type is an authentication method enabling a user to use a JWT (JSON Web Token) to obtain an Access Token from the authorization server. This JWT, which encapsulates the user's identity and permissions claims, is presented instead of traditional username and password credentials. Once acquired, the Access Token can be utilized for authenticating API calls, typically as a Bearer Token. When the Access Token expires, a new JWT can be used to request a fresh Access Token, ensuring continuous secured access without the repeated exchange of primary credentials.
To set this up, chooseJWT Auth from the Auth Config dropdown list.To test if your JWT is valid and look at examples, you can use JWT.io
Note: theiat and exp claims are generated automatically. They don't need to be specified in the config.Required Info
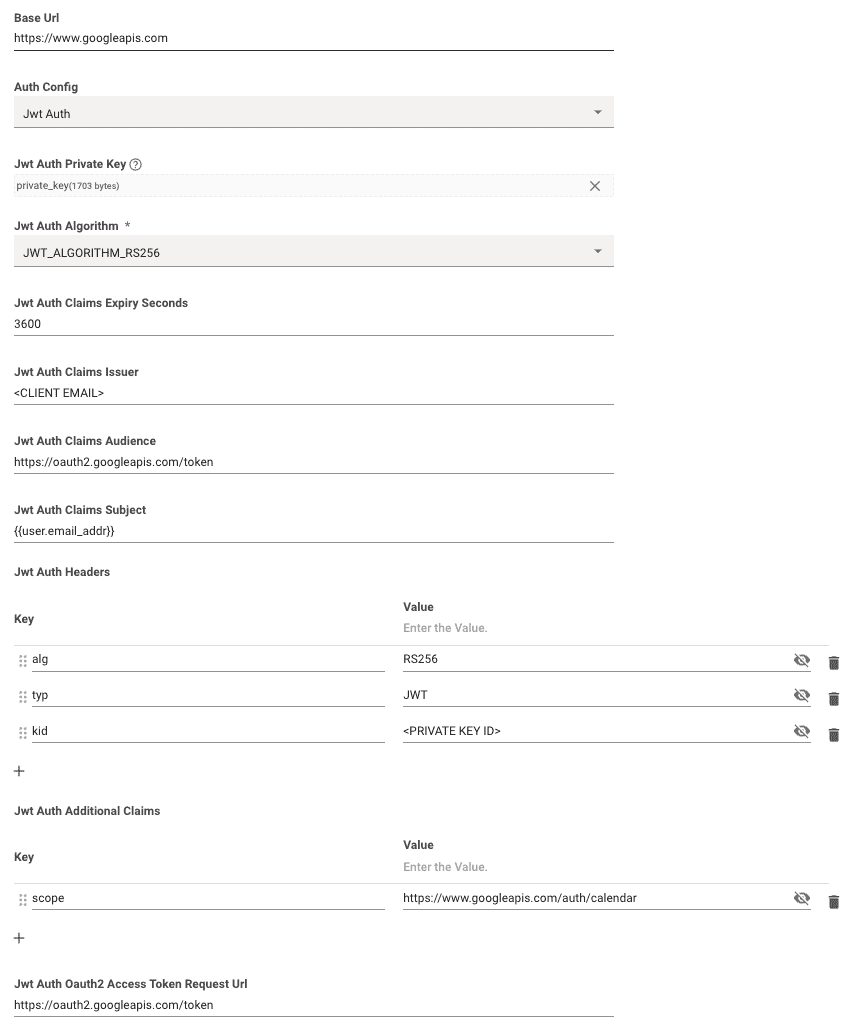
Jwt Auth Private Key: This is where you upload your Prviate Key or 256-bit secret.- See JWT.io for examples of how the private key or secret should be formatted.
Sometimes, source systems will provide the private key in the form of a string with each line separated by
\n. If you need to reformat your secret/key you can do so by creating a file with no extension and manually reformatting.
- See JWT.io for examples of how the private key or secret should be formatted.
Sometimes, source systems will provide the private key in the form of a string with each line separated by
Jwt Auth Algorithm: You can choose between HS256, RS256, & ES256 Algorithms. The one you should choose will be provided by the system you are integrating with.Jwt Auth Claims Expiry Seconds: This is where you input the time limit in seconds for the claims expiration (e.g.3600). Theexpclaim is generated based on theiat+ this value.Jwt Auth Claims Issuer: This is where you input yourissclaim.Jwt Auth Claims Audience: This is where you input youraudclaim.Jwt Auth Claims Subject: This is where you input yoursubclaim.Jwt Auth Headers: This is where you input any additional header claims needed for your JWT. Examples includealg,typ,kidJwt Auth Additional Claims: This is where you input any additional payload claims needed for your JWT. Examples includescope,name- [Optional]
Jwt Auth Oauth2 Access Token Request Url: This is where you input the full token URL. If this field is left blank, we will try to send the JWT itself as a bearer token in subsequent requests (e.g.Authorization: Bearer <YOUR_JWT>)
Auth Types Not Currently Supported:
info
support@moveworks.ai and our Product team will reach out to support you.- OAuth 2.0 - Grant Type: Authorization Code
- OAuth 1.0
- Cookie Auth
- Client Credentials Header Auth
- PKI Auth
- NTLM Auth