API Configuration
Limited Preview
This capability is in Limited Preview. You can enable it by following the instructions here.
If you are you looking for the legacy HTTP Editor Guide, you can still view it here
Prerequisites
In order to follow this guide, you need to enable the Next-gen HTTP Editor first. You can do so by going to Creator Studio > Experimental Features

Then click Enable Next-gen HTTP Editor > Submit

Step 1: Import cURL Request
You can import your entire HTTP Request to shortcut the entire Connector + HTTP Request set up.
warning
- Importing cURL will overwrite all of the current work you have in the HTTP Editor.
- If the Request you are trying to import uses a 2-step Auth method like OAuth 2.0, then you will have to set up the connector manually AFTER importing cURL.
-
Click
IMPORT CURL

- Paste your cURL command into the text box.
Where to find cURL commands:
- You can typically find cURL commands in the API documentation for the source system you are trying to integrate with
-
You can export your Postman requests to curl by clicking the
</>icon on the right toolbar in Postman.

- Double check everything is imported the way you expected. Follow on to Step 2 if you need to create a new connector or use an existing one.

Step 2: Set up Connector
Next, you may need to create a new Connector from scratch or use an existing one.
Connectors are used to securely store authentication information + base URL for the HTTP Request which can be reused for future requests. Previously created connectors can be used across new Paths & Queries use cases.
Option 1: Select Existing Connector
-
Click
Import Connector

-
Search for your existing connector & then click
APPLY

Option 2: Create New Connector
See our guide on Connector Configuration in order to set a new connector up.
Step 3: Set up HTTP Request
Known Limitations
- Requests will timeout after 60 seconds with no response from the requested server.
- Requests accept a max of 200kb responses.
- XML Responses for Queries Workspace are not supported
Step 3.1: Set up Base Request Info

If you're manually configuring your API, you can do so by editing:
-
Method- We support GET, POST, PUT, DELETE, PATCH methods. -
Endpoint URL- This is the rest of the URL Path starting from the end of the Base URL. It must start with a/.- Note: The Connector's Base URL and the inputted Endpoint URL are combined to create the full Request URL.
-
Headers- ALL Request Headers must be added to this table. -
Query parameters- ALL Query Params must be added to this table. They cannot be saved in theEndpoint URL. -
Body- ALL Body content must be added to this text box.-
Note:
If you want to use
Content-Type: x-www-form-urlencoded, you have to convert the data to the following format:key=value&key2=value2
-
Note:
If you want to use
Step 3.2: Use Variables in your Request
What Variables are available to me?
In Paths Workspace, you can use all of the Questions you have configured upstream of this HTTP Request + any User Attributes you have configured as variables
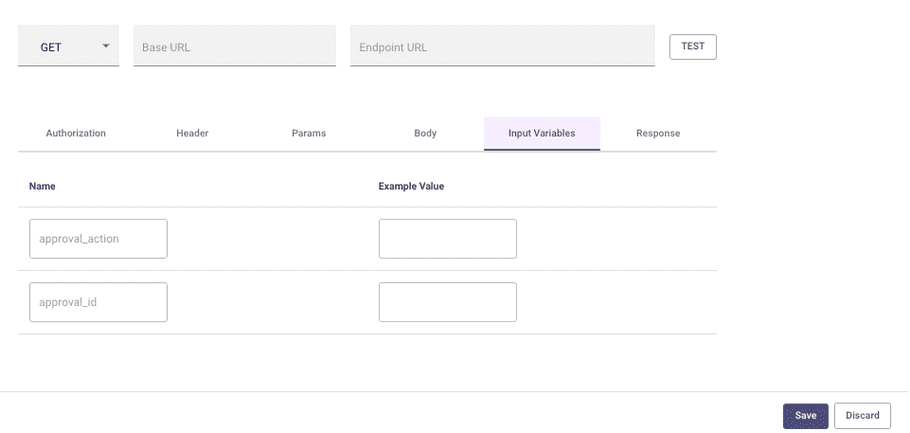
All of the variables that come from Paths Questions will be auto-populated in the Input Variables tab as a quick reference.
warning
User Attributes will NOT be populated in the Input Variables tab, however, you can view the User Attributes Reference here.
In Queries Workspace, you can use the query keyword + any User Attributes you have configured as variables.
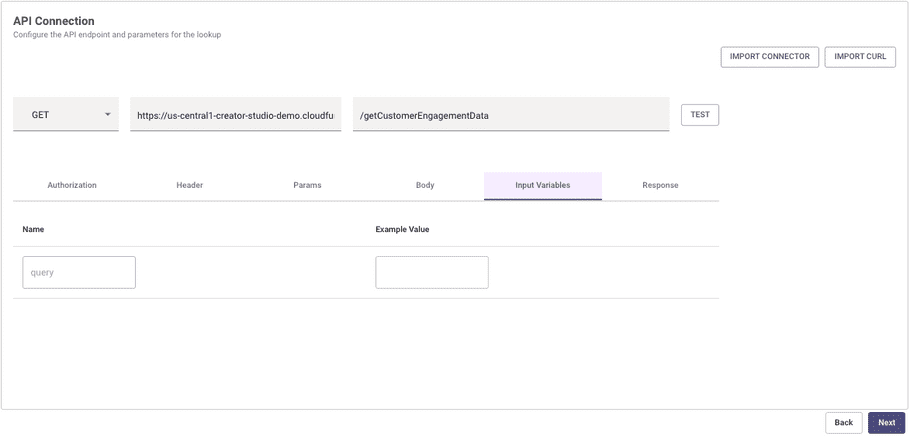
All of the variables that come from the query keyword will be auto-populated in the Input Variables tab as a quick reference.
warning
User Attributes will NOT be populated in the Input Variables tab, however, you can view the User Attributes Reference here.
Queries pre-populated Input Variables

Paths pre-populated Input Variables from previous Paths Questions

How do I reference Variables in my request?
You can use variables anywhere in the Headers, Params, Body, or Endpoint URL. They can also be used in JWT Connector Claims.
You insert variables by using {{VARIABLE_NAME}}. You can check variable names by looking at the Input Variables tab and our User Attributes Reference
info
You can use {{{VARIABLE_NAME}}} if you need avoid HTML escaping the content of the variable.

If you use a variable in the request and want to Test your API, then you must add an example value to the variable in the Input Variables tab.
warning
This does not apply to User Attributes. User Attributes will pull from the information of the current user who is logged in and configuring the request.

Using User Attributes in your API Request
Moveworks provides User Attributes that can be referenced in order to provide information about the current user to an API request. This includes data like user email address, user first & last name, user role & department, and any custom attribute.
- See our User Attribute Reference Guide to see what User Attributes are available to you and how to register more.
In order to use a User Attribute in an API request, you must use the following syntax:
"{{user.email_addr}}"Example:

Step 4. Test & Save your API!
-
Click
TESTin order to kick off a Request with the example data you inputted in theInput Variablestab.

- Get your API working and then save your connector for future use cases!
